
A couple of months ago ago the UPS man (men?) dropped off a 120 lb. box at our front door with a Smittybilt Overlander roof top tent (RTT) in it. After living with a RTT in southern Africa for two and a half weeks last year, we were convinced that sleeping high on the hog was the life for us back home, too.
Over the last few weeks we have had a chance to try it out for short trips within about 200 miles of home (hooray for Montana, public lands, and the American west in general, for easily-accessed wilderness solitude), and on a longer journey to southern Utah.
I’m going to withhold final judgments on the Overlander until we have more time with our new home away from home, but here are a few first impressions.
So, what is a roof top tent? Exactly what it sounds like – instead of pitching a dome or wall tent on the ground, a RTT bolts to the top of your vehicle, and is usually accessed by climbing a ladder. They come in two flavors – hard side (a plastic-composite box that opens upward or at an angle via hydraulic struts to reveal the sleeping space), and soft side (usually made of canvas or nylon materials that fold into a soft water-tight cover, soft side RTT’s look more like traditional tents, only sitting on top of your car).
Soft-side roof top tent design hasn’t really evolved much in the last 70 years or so. The Overlander is a relatively new product, but it’s essentially a copy of the ARB tent, which is a copy of the Howling Moon tent that was bolted to our Toyota HiLux that we rented in Africa last year, which is basically a copy of the Eezi-Awn, which, well, is the same as all the others. Many of them are even built at the same factories in China.
Smittybilt positions itself in the market as a purveyor of reasonably priced off-road equipment, and the Overlander RTT is no exception. It shipped free to us in four days (usually a $150 – $200 charge), and was at least $50 less expensive than comparable tents. We paid $829.00 out-the-door with a coupon. At that price point, why not give it a try? It sleeps two campers with plenty of space to spread out.
What did it come with? Besides the tent itself and the associated mounting hardware, additional features include: an eye-searing LED light strip with Velcro attachments for the inside (really, it’s too bright), an extra-long cord to plug it into the power point in the car, as well as adapters with USB ports for charging phones and tablets, a rugged and waterproof (with drain holes) shoe bag for hanging muddy footwear outside the tent, slightly vague installation instructions, and a rubberized travel cover. The whole thing weighs 118 lbs.
How did it install? Installation was a snap and took about two hours – bolting the aluminum structural rails to the bottom is the most detailed work, but with a helper it’s not difficult. 1-2-3, up! – onto the roof rack, and then getting the thing centered is the last step. A ratcheting box-end wrench for the mounting brackets smooths the way on this step. On our 1999 Jeep Cherokee (XJ), I’m using two old-school round Yakima crossbars with Yakima 1A gutter-mount towers to support it. I’m a little nervous about weight distribution with this two-bar set-up (how strong are those drip rails, really?). I acquired a third bar and towers recently, so that will make me feel a little bit better.
How about set-up? With very little practice, we can already get the Overlander ready for sleepy-time in about five minutes – rip the travel cover, lever the ladder, unfold, and hit the hay. The one fiddly part of set-up are the flysheet poles. This was a problem we encountered with our Howling Moon tent in Africa, too – the flysheets that create little roofs over the side windows and doors are suspended by steel polls that need to be inserted into grommets in the fly, and then bent and coaxed into pre-drilled holes in the aluminum frame that creates the base of the tent. I’m not sure if the holes are not drilled out wide enough, or at a bad angle, or if it’s that steel and aluminum don’t mix well, but this process often has us cursing.
When you’re ready to leave, what about take-down? This process is a little more involved, but still pretty straightforward. Struggle to remove the flysheet poles, then, using the ladder, fold the tent in half onto itself, tuck stray fabric into the folds, cinch Velcro straps to tighten everything up, and sling the rubberized travel cover on top. We have this process down to seven minutes. One thing to consider is that it takes a certain amount of acrobatics on taller vehicles to perform all the necessary maneuvers to get the tent furled or unfurled. This means standing on bumpers or the tops of tires to reach the various straps and velcro attachments.

Set-up and tear-down are a snap.
Tell me about that travel cover. One of the major complaints we had about the Howling Moon tent last summer was the attachment of the cover. It was made of canvas and permanently bonded to the tent structure with a badly aligned zipper. This resulted in two outcomes: (1) when we took it off, it draped over the side of the vehicle obstructing access to the doors, and (2) the poor alignment of the zipper made it a bear to install in the mornings, especially when it was cold and stiff.
The Smittybilt cover is a much, much better design – the rubberized material stretches well, and the wide Velcro strips that are used to secure it to the tent on all sides are very strong. When the cover is removed it separates completely from the tent structure, so you just fold it up and stash it between the truck roof and the tent bottom. It also has expandable corners with Velcro closures, so even on cool mornings you can stretch it over the ends of the tent with no hassle.

The Overlander packed and ready to go.
How does it sleep? The first weekend with the Overlander we escaped for two nights, and we found the mattress, while supportive, terribly stiff. This was a repeat of the Howling Moon’s mattress situation, so perhaps that’s an industry standard. An inexpensive memory foam mattress topper has mostly solved this problem. Size-wise, the mattress is between a Queen and a Full, which is great, because Julie sleeps like she’s a starfish – all limbs extended fully in every direction. It has plenty of headroom, and the bedding – one foam mattress topper, one down comforter, and a sheet, in our case – can be folded easily into the tent every day.
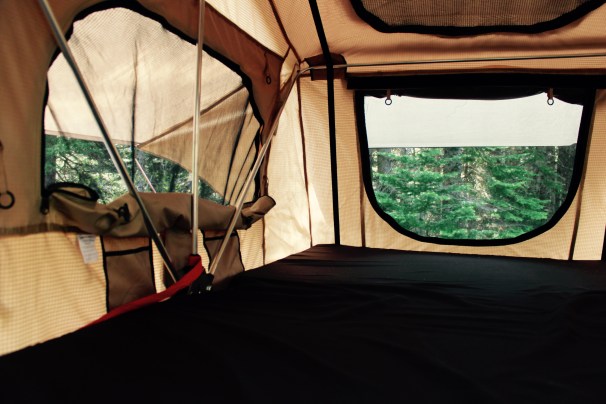
Smittybilt Overlander – inside.
How is the build quality? Build quality seems top notch – the hardware, hinges, and rivets are robust, all of the seams are sealed perfectly, and everything works as advertised. There are no stray threads or misaligned zippers. The sunroof panels are a serious bonus, and you can see the stars pretty clearly through the mesh netting. Ventilation – a major issue for us (GIVE ME ALL THE FRESH AIR) – is excellent.
Any concerns or quibbles so far? I am a little nervous about the Velcro on some of the tie-down straps for the tent structure. After only maybe three dozen openings and closings, the fuzzy side seems to be pilling already – this reduces the gripping power, and since they hold the thing together that’s a concern. The straps are bonded in the frame with rivets, so I can see maybe enhancing them with a more robust double D-ring system down the line.
***
Overall we’re pretty darn happy with our purchase. One of the intangibles is simply the motivation to get out there – with the tent ready to go on top of the Jeep, and the rest of the camping supplies packed in bins in the back, it’s embarrassingly easy to jump in the rig and hit the road at the drop of a hat.
Julie says that sleeping up high has a positive psychological effect – she’s not nearly concerned about the bear situation in Montana as she is with a ground tent. We saw two black bears on a recent trip to the Bitterroot mountains. This results in more restful sleep – something Andrew St. Pierre White has discussed in the past. Can a bear climb a ladder? You bet it can, but it’s one more psychological barrier between you and the apex carnivores
Never underestimate the benefits of a good night’s sleep.
We’ll update our experiences with the Overlander in future posts.
(A previous version of this post appeared on Overland & Expedition.)

Great post. I am considering this tent for my JKU. my biggest concern is the roof rack. I would like something with a basket. I’ve been looking at picking up a Renegade Roof Rack in the near future. I wonder if the this tent would play nice with a basket or if I need to look at a standard rail roof rack like Smittybuilts rack for the JKU. I wonder if anyone makes a basket that would fit on with the tent? Lots of questions maybe you’ll have an answer or two. Thanks!
LikeLiked by 1 person
Thanks! So far, so good on our Smittybilt tent.
As for racks, I’m not a Wrangler expert, but I’ve seen a lot of JK folks around Montana who have the Renegade racks. The big advantages seem to be the stout tie-in points on the frame, and the versatility of the system.
I think Warrior makes a variety of attachments and mounting accessories for its basket-style racks that would accommodate the mounting rails on the RTT. Of course, adding accessories adds to the cost.
It might also depend on how you orient the tent on the roof – whether you’ll have it opening over the side (like we do), or over the back. The tent allows you to mount the rails to the bottom in two different ways depending on your orientation on the roof.
LikeLiked by 1 person
Thanks for input. I’ve got some saving to do before I can build up my rig that far. I’ll keep everyone updated along the way.
LikeLiked by 1 person
Just in case someone else is reading this four years later – the fly poles are super simple – you put the straight edges into the aluminum holes first – then bend the hook sides to go in the tarp grommets. Super fast and super easy.
LikeLiked by 1 person